Updated Mar 2026

How to Highlight and Annotate Web Articles in Chrome in 2026

Mark important text in up to 5 colors, attach inline notes to any passage, and export your annotations in multiple formats — all within a distraction-free Chrome reading experience.

Beginner
5 minutes
6 steps

Before You Start

  • Google Chrome browser (desktop)
  • ReadMonkey Pro installed from the Chrome Web Store
  • At least one article saved to your ReadMonkey library
1

Save an article to your ReadMonkey library

Before you can highlight and annotate, you need a saved article. Navigate to any web page and click the ReadMonkey Pro toolbar icon to save it. The extension extracts the main content and stores it locally on your device. If you already have articles saved, skip to the next step. For a detailed walkthrough of saving articles, see our saving and organizing guide.
2

Open the article in the distraction-free reader

Open the ReadMonkey Pro side panel and click on any saved article to open it in the distraction-free reader. The reader strips away all ads, navigation, and clutter, presenting the article in a clean layout. Choose your preferred theme — light, dark, or sepia — and adjust font size and reading width to your comfort. The reader is where all highlighting and annotation happens.
Pro Tip

Use the sepia theme for extended reading sessions — it reduces eye strain compared to a pure white background, especially in low-light environments.
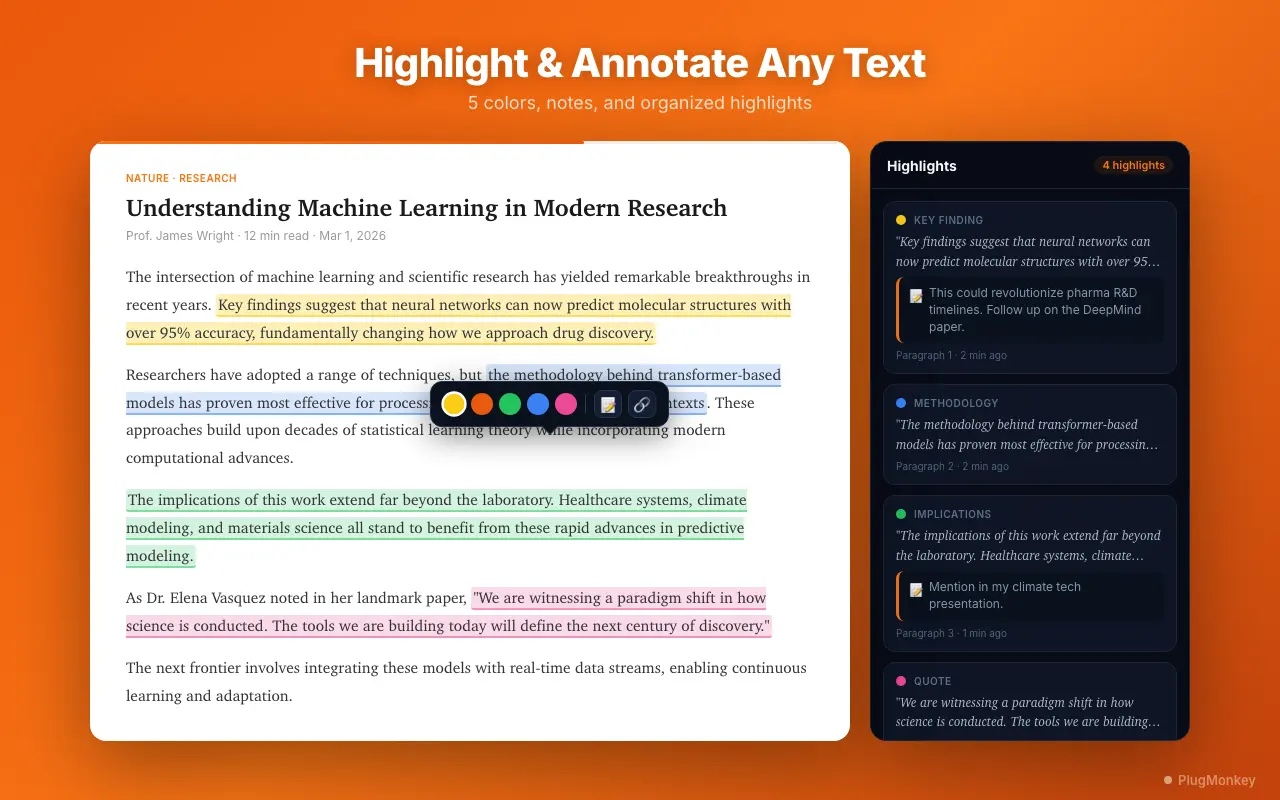
ReadMonkey Pro's distraction-free reader with highlighting
3

Highlight text with color selection

Select any passage of text in the reader and a highlight toolbar appears. Choose from 5 highlight colors: yellow, blue, green, pink, and purple. Free users have access to 2 colors (yellow and blue); Pro users unlock all 5. Use different colors to categorize information — for example, yellow for key facts, blue for definitions, green for quotes, pink for action items, and purple for questions. Your highlights are saved automatically and persist every time you open the article.
4

Add inline notes to your highlights

After highlighting a passage, click on the highlight to open the note editor. Type your annotation — a thought, a question, a summary, or a connection to another idea. Inline notes are a Pro feature that lets you attach context to any highlighted passage. Notes appear as small indicators next to the highlight, and clicking the indicator reveals your annotation. This turns passive reading into active engagement with the material.
Pro Tip

Use notes to capture your reactions while they are fresh. Write down why a passage matters, how it connects to your work, or questions it raises. These contextual notes are far more valuable than highlights alone when you review later.

5

View all highlights in the highlights panel

Open the side panel and switch to the Highlights tab to see all your highlights aggregated across articles. Each entry shows the highlighted text, the color used, any attached note, and the source article. You can filter by color to see only specific categories of highlights. This aggregated view is invaluable for reviewing key takeaways from multiple articles without reopening each one individually.
6

Export your highlights

To use your highlights outside of ReadMonkey Pro, open the export options. Free users can export highlights in JSON format. Pro users unlock Markdown, HTML, and CSV export. Markdown is ideal for pasting into Obsidian, Notion, or any knowledge management tool. CSV works well for spreadsheets and databases. You can export highlights from a single article or all highlights across your entire library — perfect for creating study notes, research summaries, or annotated bibliographies.
Pro Tip

For Obsidian users: export as Markdown and save the file directly into your vault. Each highlight becomes a blockquote with your inline note beneath it, creating ready-to-use reference notes.

Summary

You now have a complete highlighting and annotation workflow in ReadMonkey Pro. Articles are read in a distraction-free environment where you can mark important passages in up to 5 colors and attach inline notes to capture your thoughts. The highlights panel aggregates all your annotations across articles for easy review, and multi-format export lets you move your highlights into Obsidian, Notion, spreadsheets, or any tool in your workflow. The combination of color-coded highlights and contextual notes transforms passive reading into active knowledge capture. Over time, your exported highlights become a searchable archive of the most important ideas from everything you read.

Need More Help?

Get personalized AI assistance with additional tips and troubleshooting.

AI responses are generated independently and may vary

Frequently Asked Questions

Highlight and Annotate as You Read

ReadMonkey Pro gives you 5 highlight colors, inline notes, and multi-format export — all in a distraction-free Chrome reader. Free to install.